Blog Tricks

..................

This Site Helps You

...............

WHICH "BLOG CONTENTS" YOU ARE LOOKING FOR

Custom Search

Thursday, 27 October 2011

How To Add Flash Animated Label Tags Cloud Widget For Blogger ( blogspot )


1 Star2 Stars3 Stars4 Stars5 Stars

28,028 views
  ?
hi all, blogger blogging platform by default give you the ability to add Labels for your post, so you can add and display your blog Labels at your sidebar.
but because we all want our blogs look great for our visitors, we need to give this labels good style,
So now, we’ll learn how to add amazing tag/labels cloud widget to our sidebar instate of the normal one that presented by blogger.
We’ll do it in few steps.
1. Log into your blogger account.
2. Go to dashboard >> layout >> Edit HTML
3. Find the next code
You can find it by clicking ctrl+f in your browser.
And past the next code just after the above code.
<b:widget id='Label99' locked='false' title='Labels' type='Label'>
<b:includable id='main'>
<b:if cond='data:title'>
<h2><data:title/></h2>
</b:if>
<div class='widget-content'>
<script src='http://halotemplates.s3.amazonaws.com/wp-cumulus-example/swfobject.js' type='text/javascript'/>
<div id='flashcontent'></div>
<script type='text/javascript'>
var so = new SWFObject(&quot;http://halotemplates.s3.amazonaws.com/wp-cumulus-example/tagcloud.swf&quot;, &quot;tagcloud&quot;, &quot;240&quot;, &quot;300&quot;, &quot;7&quot;, &quot;#ffffff&quot;);
// uncomment next line to enable transparency
//so.addParam(&quot;wmode&quot;, &quot;transparent&quot;);
so.addVariable(&quot;tcolor&quot;, &quot;0x333333&quot;);
so.addVariable(&quot;mode&quot;, &quot;tags&quot;);
so.addVariable(&quot;distr&quot;, &quot;true&quot;);
so.addVariable(&quot;tspeed&quot;, &quot;100&quot;);
so.addVariable(&quot;tagcloud&quot;, &quot;<tags><b:loop values='data:labels' var='label'><a expr:href='data:label.url' style='12'><data:label.name/></a></b:loop></tags>&quot;);
so.addParam(&quot;allowScriptAccess&quot;, &quot;always&quot;);
so.write(&quot;flashcontent&quot;);
</script>
<b:include name='quickedit'/>
</div>
</b:includable>
</b:widget>
4. Click save template and now check your Blog. And enjoy.
Hints.
- You can change it’s location at your side bar by going to dashboard >> layout 
and move it up or down.
- you can change the widget width and height by editing this part in the code.

Tuesday, 25 October 2011

Test your blog in different screen resolutions

Have you ever considered how your blog might appear to your readers and visitors? I mean your blog may look good when you view it on your computer, but will it appear the same if you were to view it from a different computer, with a different screen resolution?
A blog with fluid-width templates stretches (or shrinks) as resolution changes. Columns or sidebars may lose their alignment, drop to the bottom or simply go out of sight in lower resolutions.
If you don’t know for sure how different resolutions affect your blog, it might be a good idea to test it, especially in resolutions lower than your computer’s. No, you don’t have to use different computers to do that. You can do it online.

Testing your blog

Go to http://resolutiontester.com/, enter your blog URL, and select a resolution. Your blog will appear inside an iframe that simulates a computer screen. The iframe will be resized to match your selected resolution. Check if your blog layout changes as you switch between resolutions.
 resolution tester

Note on smartphones
As you might’ve known Blogger has introduced mobile template a while back. If you’ve activated Blogger mobile template for your blog, it should automatically switch to mobile template when accessed using a (webkit-based) smartphone. This resolution tester however, is a mere screen resizer; it will not cause your blog to switch to mobile template, therefore it will not show the layout intended for smartphones.
For proper preview on how your blog would appear on iPhones and other smartphones go to BloggerInDraft > Dashboard > Settings > Email & Mobile > Mobile Preview.


Which resolution should you optimize for?

You can use the data from w3schools.com as a guideline. As of January 2011 most web users that visit w3schools use screen resolutions higher than 1024x768 pixels.
Date
Higher
1024x768
800x600
640x480
Other
January 2011
85.1%
13.8%
0.6%
0%
0.5%
If you want to see data specific to your blog, open Google Analytics and go to Visitors > Browser Capabilities > Screen Resolutions.
google analytics visitors screen resolutions
According to Google Analytics, only 1.5% of visitors access this blog using resolutions lower than 1024px wide. That means this blog (at 960px wide), should look fine and remain user-friendly to 98.5% of its visitors.
How about your blog?

Free Designer Blogger template: Tinted Panes

Tinted Panes is a Designer template, with added features not available in templates offered by Blogger.  tinted panes free designer Blogger template_2

Added features

This template comes with a few of the most sought after features. They are:
  1. SEO optimized page title, as explained in SEO friendly Blogger page title.
  2. Auto read more with thumbnail
    With adjustable thumbnail size and word count for the summary. (You have to edit template HTML to do this).
    Tip:
    By default, posts are actually loaded in their entirety on summary pages, even though you only see the summary. To make the browser only load the summary, you need to insert Blogger jump break. Make sure you include an image (if the post has one) and enough text for the summary before inserting the break.
    (It will not create double jump links because I have removed the original jump link code from the template)
  3. Clutter-free static pages 
    Sidebars and footers are removed from static pages. The post area is then widened to fill up the entire page width.
  4. Numbered comments
    Comments are numbered for easier referencing. To hide comment numbers, change the color to blend with comments background color.
  5. Fully customizable using Template Designer
    Tinted Panes allows you to customize the layout, number of columns, widths, fonts, backgrounds and colors right from the inside of the Template Designer.
    You are allowed to change almost every setting in Template Designer, with one exception –DO NOT SWITCH TO ANOTHER TEMPLATE (Template Designer > Templates). Changing the template will reset it to Blogger default settings and  will remove the added features.

How to install

  1. Download the template (.txt file). Note the file location.
  2. Go to Design > Edit HTML.
  3. Click Browse button, select the template file from your PC, then click Upload.
  4. To keep existing widgets, click Keep Widgets button.
  5. View your blog.
  6. Rearrange the widgets if necessary.

How to place Adsense below post title for higher CTR

adsense best placement heat map Why below post title? Because it is the position with the highest CTR (click-through rate). In other words the ad placed there will bring the most money.
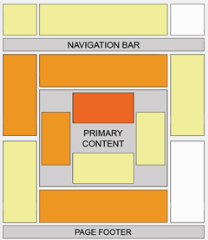
According to the Adsense ads positioning guideline published by Google, the best performing Adsense ad position is above the primary content i.e. above the blog post. This is illustrated by the heat map on the right.
Placing an ad below post title (above post content) is a not at all difficult. All you have to do is create an ad unit on Google Adsense website, get the code and add it to the specified location in your blog template.
(You can’t use Blogger’s Inline Adsense or Adsense gadget because it doesn’t have the option to add an ad under post title).
Here we go,

1. Preparing Adsense ad code

  1. Log in to Google Adsense (opens in  tab/window) to create a new ad unit.
  2. For best results choose wide ad size -either 300x250 Medium Rectangle or 336x250 Large Rectangle format. Make sure you assign a new ad channel to it for performance monitoring purposes.
  3. When the setup is complete, you will be given a code.
  4. Run the code through an HTML escape tool to escape special characters in the code. The ad won’t appear if you use the original unescaped ad code.
  5. Copy the escaped code.

2. Adding ad code to the template

  1. Go to Dashboard > Design > Edit HTML.
  2. Tick the  Expand Widget Templates check box on top right of the HTML window.
  3. Look for the following line in your HTML code:
    <data:post.body/>
  4. Paste the escaped ad code right above the line, like so:
    1<b:if cond='data:blog.pageType == &quot;item&quot;'>
    2 PLACE AD CODE HERE
    3</b:if>

    the conditional tag in lines 1 and 3 will make the ad appear only on post pages. If you want the ad to appear on all pages, just remove the lines.
  5. Save and view your blog.

3. Monitor ad performance

Make sure you monitor the ad performance. Don’t automatically assume it succeeds in increasing CTR without seeing the actual results.
No two blogs are the same, what works on most blogs may or may not work on yours. If you don’t see positive changes, test again with different ad types, formats, colors and/or placements.

Adding label (category) tabs to navigation bar

How do you add a tab (on horizontal navigation bar) that shows all the posts that fall under a subject or category in Blogger?
tab display all posts that fall under a particular label category
Before I give a correct answer, let’s first see a popular-but-wrong DIY method (using Music category as an example):
  1. Create a page with “Music” as the title. “Music” tab will be added to the bar automatically. So far so good.
  2. Attempt to add music posts to the page. This is where it gets stuck, because posts can’t be added to pages.
  3. Mission failed. 
Well, that’s the end of that.
The correct way of doing this is by adding a tab with a label URL used as the target link.  A label URL is a link that points to a label-search page. This page lists out all posts labeled with a particular label.
Here are the steps:

1. Label your posts

Label your posts according to subjects or categories (if you haven’t already done so). This is pretty basic, but if you don’t have the slightest idea what a label is or don’t know how to apply it, read How do I label my posts?.

2. Get the label URL

You can get the URL to a label-search page by right-clicking on the hyper-linked label. In Firefox you select “Copy Link Location”, in Chrome select “Copy link address”, and if you are using Internet Explorer, select “Properties” and copy the link from there.
You can usually find the labels at the bottom of your post and in Labels gadget if you have a Labels gadget installed. If you don’t see any label, you can always construct the URL yourself.
A  URL follows the format below:
http://YOURBLOGNAME.blogspot.com/search/label/YOURLABEL
For a multiple word label such as "YOUR LABEL", you need to replace the space between words with %20, like so: YOUR%20LABEL. Labels are case sensitive, make sure you enter the correct letter case.
Example:
This is the URL for BloggerSentral’s “SEO and traffic” label. Clicking it will take you to a page showing all posts that fall under that label (opens in new tab/window):

3. Add the tab with the label URL

The method of adding the tab is different depending on the type of widget used for the horizontal navigation bar.
  • To add the tab to the Pages gadget, follow this tutorial: Adding non-page links to Pages/PageList gadget.
  • If your tabs uses a LinkList gadget, enter the URL into “New Site URL” text box.
  • For tabs that are made of list items or anchor tags, just add the label URL as a target link like so: <a href="PUT LABEL URL HERE" >Link Text</a>

Different styling for different page type

how to do the same thing, except this time we don’t use conditional tags. However this approach is limited only to page types that are represented by the pageType data tag, namely index, post, archive and static pages.
Here we go,

1. Assign class to body element

First we need to assign a class to the body element so that we can reference it from the stylesheet. And the class has to be somehow linked to the page type. We can achieve this by using pageType data as the class name. We only need to do this once. Here’s what to do:
Find this:
<body expr:class='&quot;loading&quot; + data:blog.mobileClass'>
and replace it with this:
<body expr:class='&quot;loading&quot; + data:blog.mobileClass + &quot; &quot; + data:blog.pageType'>
In older and most third party templates you will find body tag without any attribute, like so:
<body>
If this is your case, replace it with:
<body expr:class='data:blog.pageType'>

2. Adding CSS rules

You can style a HTML element by adding a CSS rule in the stylesheet.  For example, this is the rule for hiding post timestamp:
.post-timestamp {display: none;}
Normally, this rule applies the styling on ALL pages i.e.. hides the post timestamp across the entire blog. How then we specify a page type and make the code apply only on that particular page type? The answer is by adding the page type class name (and a space) in front of the selector. Refer to the table below.

Page type
Class name
Index pages .index
Post pages .item
Archive pages .archive
Static pages .static_page

Let say you want to hide the post timestamp only on static pages, then the code becomes:
.static_page .post-timestamp {display: none;}
To make sure the new rule “stick”, you need to add it at the end of the stylesheet. This can be done either by putting it before before ]]></b:skin> line in the template Design > Edit HTML or by adding it via Template Designer > Advanced > Add CSS.
With this method any more individual page type styling will be done entirely in CSS stylesheet. The result would be a cleaner, lighter and W3C compliant code. (If we use the conditional tag method, styling four individual page types, would require the addition of four conditional tags in HTML!).

Blogging on the go with BlackBerry

Every blogger, at one point or another, will experience the sedentary blues. By its very nature blogging is a solitary, static act. Even in a group blog setting, when it comes time to write a post it's just you in front of your computer. After days, weeks, and months, the desire to get out of the house and work elsewhere can become tough to ignore. Seasoned bloggers know the best places to get a breath of fresh air: coffee shops and libraries. But what happens when those haunts get stale? What happens on a nice day when you want to stretch out at the park?
Of course, there is no WiFi network at your local park. There might not be any power outlets. That leaves blogging prospects pretty slim. You can write, sure, but you'll lack the internet as a research tool. There has to be a compromise right? The easiest way to write at the park is to tether your smartphone to your laptop. But nowadays carriers are charging extra for that feature. The solution, then? Write on your smartphone.
mobile bloggingThe BlackBerry has long been a writer's and telecommuter's lifeline. It provides an email platform that is second to none, and an organizational system, including calendar and task lists, that match any other smartphone platform. Kids these days might be buying iPhones and Android smartphones, but for the professional the BlackBerry is still the gold standard. Its most attractive feature, the physical keyboard, can help you get out of the house and into the park, all while keeping up with your blogging.
Recently Research In Motion released a whole new line of BlackBerry models -- models that, unlike their predecessors, do not disappoint. They're fast, powerful devices that can let you surf the internet, organize your life, track your email, and, yes, keep up your blog while on the go. The BlackBerry Montana, now known as the Bold 9930, might be the ideal device for all of this. It combines the best of the old BlackBerry -- the organization and the physical keyboard -- with the best in new technology: a touchscreen. The combination provides users with powerful tools that let them do work from wherever they may roam.
Unlike older BlackBerry models, the internet browser is actually usable on the Bold 9930. It loads pages quickly and lacks the lag issues that plagued earlier models. That makes it viable for quick research. Stuck on an idea? Search around and see what you can find, just as you would on your desktop or laptop at home. Need to check facts or find some missing information? It's all easy with the new, faster browser. In fact, that's one of the biggest upgrades in this model.
Apps, too, play a role in the BlackBerry's ability to keep you mobile. For WordPress users, there might be no app more important than WordPress for BlackBerry. In the app you can not only create new posts, but you can manage your blog just as you would from home. You can create posts, upload and add images, categorize and tag, and even schedule the post for later publishing. And when you're done with the post, you can go to your tasks lists and check it off.
(Editor’s remark: For Blogger platform, there is no app available at present. Users can use Blogger Mobile instead.)
The only issue users might have with writing on the BlackBerry is the keyboard. Yet after a short acclimation period, most users will find that thumb typing can still yield fast word per minute rates. In fact, the BlackBerry Bold 9930 has the most comfortable keyboard of any BlackBerry model to date, complete with large keys. It makes writing a post a snap -- unlike Android and iPhone, where you have to use a clunky touchscreen keyboard. The physical keyboard on the BlackBerry makes writing not only possible, but perhaps even enjoyable.
In the past few years the BlackBerry has gotten a reputation as inferior to Android and iPhone, but that's a general and inaccurate assessment. For professionals, especially blogging professionals, the BlackBerry still provides essential features. Bloggers using the WordPress platform will find everything they need right on the BlackBerry. Brainstorm, research, and then write from wherever. And you don't even need to lug along your laptop.

Essential iPhone Apps For Every Blogger

iphone apps for blogging As mobile high speed internet connections become faster and more reliable, we can expect blogging to become more mobile as well. Typing out a full blog post including images and media on an iPhone used to be a chore. Nowadays, blogging from your iPhone is relatively painless and hassle-free with the use of a few handy applications from the iTunes Store. Here are 8 of the best blogging apps on the market today for the iPhone platform.
 

WordPress

When most people think of blogging, they think Wordpress. The Wordpress iPhone App gives anybody the ability to update their Wordpress-based or hosted blog quickly and easily. Featuring an intuitive and responsive interface and support for nearly every capability baked into Wordpress, the official iPhone app is all you need to blog on the go. Just make sure you have Wordpress 2.9.2 or above installed, and this application will fit your work flow perfectly.
 

Blogger

Believe it or not, many people still use Blogger to publish content on the web; quite a few people, in fact. While many have moved on to Wordpress, Tumblr, Typepad, and other platforms, Blogger remains popular. That's why the Blogger application is such a big draw at the iTunes Store. It does exactly what you'd expect, without a lot of fuss or confusing options to muddle through. If you're looking for a simple way to post to your Blogger blog, this is the application for you.
 

Tumblr

It seems like all the cool kids are using Tumblr nowadays. The Tumblr app for the iOS platform is basically the same thing as the Wordpress application, but with a greater focus on media and quick blogging. Many Tumblr users tend to publish shorter posts, and that's reflected in the user interface. If you just want to dash off a quick blurb to your Tumblr blog, this is the best way to do it.

EverNote

Sometimes, keeping sources and information well-organized and at arm's reach is of paramount importance when you're running a well-read, high traffic blog. When inspiration for your next killer post strikes or you just want to share something with a friend or colleague, the EverNote iPhone app is your best friend. Whether it's a great photo, quote, or video clip that you want to access later, Evernote is the best way to archive things on your iPhone.
 

Byline

In a nutshell, Byline is basically just a feed aggregator for your favorite RSS streams, news websites, and blogs. What sets Byline apart is its refined UI, snappy responsiveness, and ease of configuration. You can set up your news streams any which way you like, and it also utilizes local storage to intelligently cache feeds in case you lose your high speed Internet connection while you're on the go.
 

Adobe Photoshop Express

Most people wouldn't think that you'd be able to accomplish a lot of photo manipulation on a smart phone. They clearly haven't met Adobe Photoshop Express, a nifty application that allows anyone with an iPhone to perform a number of different operations on images and photographs. Whether you need to crop a snapshot, apply a filter, or use special effects, Photoshop Express has you covered.
 

Air Sharing

You have to hand it to Apple, they make sharing and transferring files easy, as long as you're using Apple products, of course. Air Sharing makes it a simple task to compose drafts on your iPhone and then quickly transfer them to your computer at home or at the office for a final review before you publish your work. If you're a Mac user who blogs, Air Sharing belongs on whatever mobile device you use.
 

Analytics App

The name of this application pretty much says it all. Analytics App is focused on giving users the ability to interact with their Google Analytics account and get information about web traffic on the go. It allows you to customize your data and results any way you see fit. Now that Google Analytics delivers real-time results on web traffic, any blogger with a popular website can't afford to not have an analytics application on their smart phone.
 

The long and short of it

Ultimately, it's tough to make up for the lack of screen real estate that a laptop or even a tablet can provide. But you can still be a productive and effective mobile blogger with the help of a few handy applications such as the ones listed above. Thanks to a little innovative software, location and hardware constrictions don't have to curtail your ability to blog when you're away from home.

Interesting web sharing trends

addthis sharing trendsWhat is the best time to publish your posts? What is the most popular method of sharing content? Well if you are looking for the answers, read further.
AddThis recently highlighted some interesting findings on web sharing trends,  by analyzing its five years’ (2006-2010) worth of data. While the data may not give the complete sharing picture, it’s still worth checking out considering AddThis claims to be the largest content sharing platform on the web, used by 10 million websites and reaches 1.2 billion users each month.
Maybe we can learn something from those findings, like how do people share content on the web? When do they share it? What are the most popular social media sharing sites? etc.
Below are some of the findings:
 

Top sharing times

  • Peak hour: Peak sharing occurs at 9:30am EST (14:30 GMT) every day.
  • Peak Day: Wednesdays are the peak days for sharing.

When do people click?

  • Most users click 2 minutes after the content is shared.
  • 75% of clicks occur within the first day of a share.

Top shares growth all time

  • Twitter: 35,356%
  • Facebook & Like: 5,809%
  • LinkedIn: 3,226%
  • StumbleUpon: 2,912%
  • Tumblr: 1,142%

Past year (2010) growth

Trending Up
Trending Down
Facebook Send: 756% iGoogle: -68%
Tumblr: 532% AOL Lifestream: -63%
Google +1: 418% MySpace: -53%
PingFM: 272% Delicious: -46%
LinkedIn: 243% Digg: -46%

Most sharing happens via URL copy-paste

Still most sharing is done by copying URLs directly from the address bar to emails, IMs and other social channels. This method is used up to 10 times more  than sharing tools.

Adding a Nabble embeddable forum to Blogger

Nabble embedded forum
So you want to put a forum / bulletin board on your Blogger/blogspot blog. A chatbox, shoutbox or comment widget in a sidebar just doesn’t cut it, you want a real forum, for free. You heard that it can’t be done.
Well it can be done really, with Nabble embeddable forum (thanks to Ralph for sharing the info). Here is a step by step guide to make your real forum a reality:

Create a forum

  1. Go to Nabble.com and register.
  2. Select Start a Free Forum.
  3. Enter your forum name inside and click Create Forum.
  4. Click Yes, create sample sub-forums button.
  5. To add a sub-forum go to Options > Structure > Create a new sub-forum.
  6. Once you’re satisfied with the results, click Embedding Options link on top right corner.
  7. You will see a simple code in a text box, similar to the sample below.
    <a id="nabblelink" href="http://n3.nabble.com/Blogger-Sentral-Forum-xxxxxx.html">Blogger Sentral Forum</a>
    <script src=http://n3.nabble.com/embed/xxxxxx></script>
  8. Copy the code.

Embed the forum in a page

  1. Go to Edit Posts > Edit Pages and click New Page button to create a new page.
  2. Switch to HTML mode and paste in the forum code.
  3. Click Publish. That’s it your forum is installed.
  4. Now, view your page. You should see the forum added to the page. It will look something like this:
blogspot forum before Hey, you call this a forum?

Customize the appearance of your forum page

I have to agree looking at screenshot, it is nothing to brag about. You probably wish  you could remove all the unnecessary stuff from the page and make the forum fill up the entire blog width.
Well, wish granted, provided you follow the instructions in Apply different layout/styling to static pages. When you’re done with that, your forum page might as well look something like this:
blogspot forum after Now that’s more like a forum

Forum features

  • The forum comes with all the features similar to any other forums.
  • Readers will browse, search, post, and navigate without ever leaving your page. The same applies to forum maintenance.

Listing post titles in alphabetical or chronological order

post title alphabetical order
In this tutorial I will show you how to list the titles of your blog’s 1000 most recent  posts. If you are looking for an alternative to Blogger’s Archive gadget, then this might be it. This list can also be used as a Table Of Contents. This list is made possible with the use of Yahoo! Pipe.
See the demo in Blogger Sentral Widget Showcase.
The list comes with several options:
  1. List them inside a widget or inside a post page.
  2. Arrange the titles in alphabetical or chronological order. If you use your blog as an online serial novel, then chronological order is just what you need.
  3. Append (or not) a comment count at the end of each title.
  4. Choose numbered or bulleted list style.
Let’s get started,

1) The code

<!-- Alphabetical/chronological Post Title Listing with comment count Start -->
<script type="text/javascript">
function getYpipeTL(feed) {
 document.write('<ul style="font-weight:bold">');
 var i;
 for (i = 0; i < feed.count ; i++)
 {
var href = "'" + feed.value.items[i].link + "'";
var pTitle = feed.value.items[i].title;
var pComment = " \(" + feed.value.items[i].commentcount + " comments\)";
var pList = "<li>" + "<a href="+ href + '" target="_blank">' + pTitle;
 document.write(pList);
 document.write(pComment); //to remove comment count delete this line
 document.write('</a></li>');
 }
 document.write('</ul>');
 }
 </script>
 <script src="http://pipes.yahoo.com/pipes/pipe.run?
 YourBlogUrl=http://www.bloggersentral.com
 &Order=alphabet
 &_id=401e43055731c1a29f1e1d3eb5e8e13f
 &_callback=getYpipeTL
 &_render=json" 
type="text/javascript"></script>
<span style="font-size: 80%; float:right;">Get this <a href="http://www.bloggersentral.com/2009/12/list-post-titles-in-alphabetical-order.html" target="_blank">widget</a></span>
<!-- Alphabetical Post Title Listing End -->

2) Put the list in a (dedicated) post page

Use this option if you want to put the list on a separate page. (You can then access it via a tab.)
  1. Create a new page by going to Posting > Edit Pages and clicking the New Page button.
  2. Click Edit HTML tab to switch to HTML mode.
  3. Copy and paste the code into the editor.
  4. Click Post Options at the bottom of the editor. Under the Edit HTML Settings heading, select Ignore newlines.
    post options
  5. Publish and view your post . The list should appear inside the page.
  6. Then add a link to the page from your homepage. This can be done by adding navigation tabs. If you have the page gadget installed, this is added automatically by Blogger.
  7. If you want to remove the extras (sidebars, footer etc.) from the page, read Apply different layout/styling to static pages.

3) Put the list in a gadget

Use this option if you want to put the list on a sidebar, making it visible at all times.
  1. Go to Design > Page Elements.
  2. Click Add A Gadget link.
  3. Select HTML/Javascript gadget.
  4. Enter the title of your widget e.g. All Posts List.
  5. Copy and paste the code inside the content box. Replace http://www.bloggersentral.com (the value of YourBlogUrl) in code line 20 with your own blog URL. Do not include the trailing slash (as in .com/). Refer to step 4 for options/customizations.
    Reminder: In the process of editing your code, never switch to Rich Text mode. Doing so will add line breaks (<br/>) in your code, rendering the code useless.
  6. Save and view your blog.

4) Customizing the list

Below are a few available customizations/options:
  • Listing order -the default order is alphabetical. To change to chronological order, just change the word alphabet in code line 21 to chrono.
  • Comment count - comment count is displayed by default. To remove comment count, delete code line 13.
  • List style -the default is bulleted list. To change to numbered list, replace ul (in line 4 and 16) with ol.
  • Style the list with the inline style attribute in line 4.
  • If your list becomes too long, you might want to put it in a scroll box

5) Editing the pipe (optional)

If you want further customize the widget output, you need to edit the (Yahoo) pipe itself. Follow the steps below:
  1. Go to the Yahoo! pipe.
  2. Log in to your Yahoo! account.
  3. Create a clone by clicking the Clone button.
  4. Click edit source to edit it in anyway you like.
  5. When you’re done editing and saving, test run it by clicking Run Pipe button to confirm the output of the pipe.
  6. To use your edited pipe, copy the pipe id and paste it to replace the existing id in line 22. (To get the id, look in your browser’s address bar. The id is the end part the URL when you are viewing or editing the pipe.)

Floating social media sharing buttons

As promised to some of my readers, here’s a tutorial on how to add a Mashable-like floating bar of social media buttons to a Blogger blog. I made it into a widget, so you don’t have to go into your template HTML to install (or remove) them. Just drop the whole code into a HTML/Javascript gadget.
I have included Facebook Share, Retweet, Stumble, Google Buzz, Digg This and Google +1 (plus one) buttons in the bar. Each of them comes with a live counter. The corners of Facebook Share button and counter are rounded to blend with the rest of the buttons (doesn’t work in Internet Explorer, of course). You can add more social bookmarking or sharing buttons later if you wish.
floating social bookmarking buttons

I. Adding the buttons

  1. Login to your Blogger account.
  2. Go to Design > Page Elements.
  3. Click Add A Gadget.
  4. In Add A Gadget window, select HTML/Javascript .
  5. Copy the code below and paste it inside the content box.
    <!-- floating page sharers Start bloggersentral.com-->
    <style type="text/css">
    #pageshare {position:fixed; bottom:15%; margin-left:-71px; float:left; border-radius:5px;-moz-border-radius:5px;-webkit-border-radius:5px;background-color:#fff;padding:0 0 2px 0;z-index:10;}
    #pageshare .sbutton {float:left;clear:both;margin:5px 5px 0 5px;}
    .fb_share_count_top {width:48px !important;}
    .fb_share_count_top, .fb_share_count_inner {-moz-border-radius:3px;-webkit-border-radius:3px;}
    .FBConnectButton_Small, .FBConnectButton_RTL_Small {width:49px !important; -moz-border-radius:3px;/*bs-fsmsb*/-webkit-border-radius:3px;}
    .FBConnectButton_Small .FBConnectButton_Text {padding:2px 2px 3px !important;-moz-border-radius:3px;-webkit-border-radius:3px;font-size:8px;}
    </style>
    <div id='pageshare' title="Get this from BloggerSentral.com">
    <div class='sbutton' id='fb'>
    <a name="fb_share" type="box_count" href="http://www.facebook.com/sharer.php">Share</a><script src="http://static.ak.fbcdn.net/connect.php/js/FB.Share" type="text/javascript"></script>
    </div>
    <div class='sbutton' id='rt'>
    <script src="http://tweetmeme.com/i/scripts/button.js" type='text/javascript'></script>
    </div>
    <div class='sbutton' id='su'>
    <script src="http://www.stumbleupon.com/hostedbadge.php?s=5"></script>
    </div>
    <div class='sbutton' id='digg' style='margin-left:3px;width:48px'>
    <script src='http://widgets.digg.com/buttons.js' type='text/javascript'></script>
    <a class="DiggThisButton DiggMedium"></a>
    </div>
    <div class='sbutton' id='gplusone'>
    <script type="text/javascript" src="https://apis.google.com/js/plusone.js"></script>
    <g:plusone size="tall"></g:plusone>
    </div>
    <div style="clear: both;font-size: 9px;text-align:center;">Get <a href="http://www.bloggersentral.com/">widget</a></div><!-- Do not remove this link -->
    </div>
    <!-- floating page sharers End -->
    Update
    July 2011: Remove Google Buzz button. Who needs Buzz when you have +1?
    June 2011: Add Google Plus One button.
    July 2010: Add Digg This button.
  6. Save the gadget.
  7. Drag the gadget and reposition it under Blog Posts gadget.
  8. Click Save button on upper right corner.

II. Customizing

  1. Vertical alignment
    Change the value of bottom in code line 3. The code positions the button relative to the bottom of your browser window. To fix the distance even when window is resized, specify the value in px (pixels) instead of %.
  2. Horizontal alignment
    Change the value of margin-left in code line 3. Negative value pushes the button to the left of the main blog column, positive value pushes it to the right.
    To position the button relative to the left or right edge of browser window, replace the margin-left with left (as in left:10px;) or right (as in right:10px;) respectively.
  3. Replacing and removing buttons
    You can replace existing buttons with your own. Each button is represented by this code:
    <div class='sbutton'>
    BUTTON CODE
    </div>
    To replace the button, simply replace the button code with the new code.
    To remove the button, delete the whole div.
Update: If somehow your Google +1 button doesn’t appear despite other buttons appear successfully, try this workaround:
  1. Go to Design > Edit HTML and find this line:
    <body expr:class='&quot;loading&quot; + data:blog.mobileClass'>
    or
    <body>
  2. Copy the code in step I.5 and paste it right below the line.
  3. Replace the margin-left:-71px; in code line 3 with left:10px;.
  4. Preview before saving.

Add Custom Search box to navigation/menu bar

This tutorial will show you how to add a Google Custom Search box to horizontal navigation bar, just like what you see here in Blogger Sentral. (Google Custom Search enables you to search within a collection of blogs or websites of your choice).
google custom search on navigation bar

Step 1. Create your custom search engine

For the custom search to work you need a Google custom search engine to go with the search box. Follow the steps below to create one.
Note: This tutorial is not applicable to Search Box gadget added via Design > Page Elements.

  1. Go to Google Custom Search to create a custom search engine.
  2. If your are an Adsense publisher you can also use Adsense for search
  3. Configure the search engine and get the code for the search box.
  4. Look for the search engine unique ID in the code. It should look something like this: 006442829066104501157:setkk2xdqoi or this: partner-pub-4409159435154980:sle4z0smh1f
    We are only interested in this ID, the rest of the code is of no use.

Step 2. Create the search box

This is the code for the search box:
<!-- Google custom search box Start -by BloggerSentral.com -->
<div class='cse' style='color:#000000;float:right;margin:6px 10px 0 0 ;'>
<form action='http://www.google.com/cse' id='cse-search-box'>
<input name='cx' type='hidden' value='partner-pub-4409159435154980:sle4z0smh1f'/>
<input type='text' name='q' size='35' />
<input name='ie' type='hidden' value='ISO-8859-1'/>
<input type="submit" name="sa" value="Search" />
</form>
<script type="text/javascript" src="http://www.google.com/cse/brand?form=cse-search-box&amp;lang=en"></script>
</div>
<!-- Google custom search box End -->
Mar. 2011: Code updated to include Google Custom Search logo and search button.
Dec. 2010: Code update.
  1. Replace the value of value attribute in line 4 with the Search engine unique ID from Step 1.3.
  2. To make the search results appear in a new window, just add target="_blank" before the closing bracket in line 3.
  3. You can modify the search text box width by changing the value of size attribute in line 5.

Step 3. Add search box to navigation bar

The steps below will place the search box on the right hand side of the bar.
  1. Login to your Blogger account.
  2. Go to Dashboard > Design > Edit HTML.
  3. Back up your template.
  4. Tick the  Expand Widget Templates check box on top right of the HTML window.
  5. If your navigation bar is made of Pages gadget, look for this code:
    <b:widget id='PageList1' locked='false' title='Pages' type='PageList'>
    <b:includable id='main'>
    <b:if cond='data:title'><h2><data:title/></h2></b:if>
    <div class='widget-content'>
    <ul>
    PUT THE SEARCH BOX CODE HERE
    <b:loop values='data:links' var='link'>
  6. Insert the search box code from Step 2 right after the <ul> line.
  7. If your navigation bar is made of a LinkList gadget, look for LinkList (instead of PageList) in line 1.
    If you created your navigation bar using Blogger Sentral’s Creating navigation or menu tabs in Blogger tutorial, just add the search box code right after <div id="navibar"> line of the navigation tabs code.
  8. Preview before saving.

Monday, 3 October 2011

FREE DOWNLOADS AVILABLE WEBSITES LIST

ALL WEBSITES  LIST


Website,
[website language]
TrafficRelated CategoriesPrimary Country,
CMS Platform
FREE DOWNLOAD SOFTWARE downloadajasesukamu.blogspot.com[en]free downloaddownload softwaredownload acceleratordownload manager
Download free softwares,music,movies etc from the
net downloadfreethings.wordpress.com[en]free downloadsoftware downloaddownload softwaredownload free mp3
sitedownload.net[en]free downloaddownload softwaredownload free,download managerflag Vietnam
WordPress 3.2.1
Das Download Archiv | Software | Treiber | Games
|DDA das-download-archiv.de[de]10.08Kfree downloadsoftware downloaddownload softwaredownload managerflag Germany
WordPress 3.2.1
Free Software Downloads - Collection of software programs,
drivers and games - RoSoftDownload rosoftdownload.com[en]1.35Kfree downloadsoftware downloaddownload acceleratordownload manager
WordPress 3.2.1
freeeedownloads.com[en]free downloaddownload freedownload free mp3,free mp3
WordPress 3.2.1
SoftFullDownload softfulldownload.blogspot.com[en]software download,download software,download freedownload manager
WordPress 3.2.1
srcdl.com[fa]free downloadsoftware downloaddownload softwaredownload free
WordPress 3.2.1
secret-memories.com[en]free downloaddownload softwaredownload free mp3free mp3flag Indonesia
WordPress 3.2.1
one-freedownload.blogspot.com[en]free downloadfree edition,download avginternet downloadflag Indonesia
WordPress 3.2.1


E book11,438sites    Easy to use9,369sites    Free download7,935sites    Download free6,223sites    How to use5,365sites   Free mp32,244sites    Software download1,723sites    Download software1,447sites    Totally free1,010sites    Download manager579sites   Internet download435sites    Free download software354sites    Internet download manager347sites    Download free mp3342sites   Free edition314sites    Download driver208sites    Download speed163sites    Pc download159sites    Download accelerator133sites   Download flv66sites
more...