Blog Tricks

..................

This Site Helps You

...............

WHICH "BLOG CONTENTS" YOU ARE LOOKING FOR

Custom Search

Tuesday, 25 October 2011

How to place Adsense below post title for higher CTR

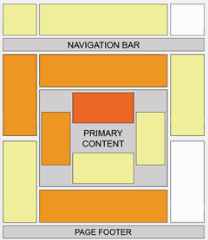
adsense best placement heat map Why below post title? Because it is the position with the highest CTR (click-through rate). In other words the ad placed there will bring the most money.
According to the Adsense ads positioning guideline published by Google, the best performing Adsense ad position is above the primary content i.e. above the blog post. This is illustrated by the heat map on the right.
Placing an ad below post title (above post content) is a not at all difficult. All you have to do is create an ad unit on Google Adsense website, get the code and add it to the specified location in your blog template.
(You can’t use Blogger’s Inline Adsense or Adsense gadget because it doesn’t have the option to add an ad under post title).
Here we go,

1. Preparing Adsense ad code

  1. Log in to Google Adsense (opens in  tab/window) to create a new ad unit.
  2. For best results choose wide ad size -either 300x250 Medium Rectangle or 336x250 Large Rectangle format. Make sure you assign a new ad channel to it for performance monitoring purposes.
  3. When the setup is complete, you will be given a code.
  4. Run the code through an HTML escape tool to escape special characters in the code. The ad won’t appear if you use the original unescaped ad code.
  5. Copy the escaped code.

2. Adding ad code to the template

  1. Go to Dashboard > Design > Edit HTML.
  2. Tick the  Expand Widget Templates check box on top right of the HTML window.
  3. Look for the following line in your HTML code:
    <data:post.body/>
  4. Paste the escaped ad code right above the line, like so:
    1<b:if cond='data:blog.pageType == &quot;item&quot;'>
    2 PLACE AD CODE HERE
    3</b:if>

    the conditional tag in lines 1 and 3 will make the ad appear only on post pages. If you want the ad to appear on all pages, just remove the lines.
  5. Save and view your blog.

3. Monitor ad performance

Make sure you monitor the ad performance. Don’t automatically assume it succeeds in increasing CTR without seeing the actual results.
No two blogs are the same, what works on most blogs may or may not work on yours. If you don’t see positive changes, test again with different ad types, formats, colors and/or placements.

Adding label (category) tabs to navigation bar

How do you add a tab (on horizontal navigation bar) that shows all the posts that fall under a subject or category in Blogger?
tab display all posts that fall under a particular label category
Before I give a correct answer, let’s first see a popular-but-wrong DIY method (using Music category as an example):
  1. Create a page with “Music” as the title. “Music” tab will be added to the bar automatically. So far so good.
  2. Attempt to add music posts to the page. This is where it gets stuck, because posts can’t be added to pages.
  3. Mission failed. 
Well, that’s the end of that.
The correct way of doing this is by adding a tab with a label URL used as the target link.  A label URL is a link that points to a label-search page. This page lists out all posts labeled with a particular label.
Here are the steps:

1. Label your posts

Label your posts according to subjects or categories (if you haven’t already done so). This is pretty basic, but if you don’t have the slightest idea what a label is or don’t know how to apply it, read How do I label my posts?.

2. Get the label URL

You can get the URL to a label-search page by right-clicking on the hyper-linked label. In Firefox you select “Copy Link Location”, in Chrome select “Copy link address”, and if you are using Internet Explorer, select “Properties” and copy the link from there.
You can usually find the labels at the bottom of your post and in Labels gadget if you have a Labels gadget installed. If you don’t see any label, you can always construct the URL yourself.
A  URL follows the format below:
http://YOURBLOGNAME.blogspot.com/search/label/YOURLABEL
For a multiple word label such as "YOUR LABEL", you need to replace the space between words with %20, like so: YOUR%20LABEL. Labels are case sensitive, make sure you enter the correct letter case.
Example:
This is the URL for BloggerSentral’s “SEO and traffic” label. Clicking it will take you to a page showing all posts that fall under that label (opens in new tab/window):

3. Add the tab with the label URL

The method of adding the tab is different depending on the type of widget used for the horizontal navigation bar.
  • To add the tab to the Pages gadget, follow this tutorial: Adding non-page links to Pages/PageList gadget.
  • If your tabs uses a LinkList gadget, enter the URL into “New Site URL” text box.
  • For tabs that are made of list items or anchor tags, just add the label URL as a target link like so: <a href="PUT LABEL URL HERE" >Link Text</a>

Different styling for different page type

how to do the same thing, except this time we don’t use conditional tags. However this approach is limited only to page types that are represented by the pageType data tag, namely index, post, archive and static pages.
Here we go,

1. Assign class to body element

First we need to assign a class to the body element so that we can reference it from the stylesheet. And the class has to be somehow linked to the page type. We can achieve this by using pageType data as the class name. We only need to do this once. Here’s what to do:
Find this:
<body expr:class='&quot;loading&quot; + data:blog.mobileClass'>
and replace it with this:
<body expr:class='&quot;loading&quot; + data:blog.mobileClass + &quot; &quot; + data:blog.pageType'>
In older and most third party templates you will find body tag without any attribute, like so:
<body>
If this is your case, replace it with:
<body expr:class='data:blog.pageType'>

2. Adding CSS rules

You can style a HTML element by adding a CSS rule in the stylesheet.  For example, this is the rule for hiding post timestamp:
.post-timestamp {display: none;}
Normally, this rule applies the styling on ALL pages i.e.. hides the post timestamp across the entire blog. How then we specify a page type and make the code apply only on that particular page type? The answer is by adding the page type class name (and a space) in front of the selector. Refer to the table below.

Page type
Class name
Index pages .index
Post pages .item
Archive pages .archive
Static pages .static_page

Let say you want to hide the post timestamp only on static pages, then the code becomes:
.static_page .post-timestamp {display: none;}
To make sure the new rule “stick”, you need to add it at the end of the stylesheet. This can be done either by putting it before before ]]></b:skin> line in the template Design > Edit HTML or by adding it via Template Designer > Advanced > Add CSS.
With this method any more individual page type styling will be done entirely in CSS stylesheet. The result would be a cleaner, lighter and W3C compliant code. (If we use the conditional tag method, styling four individual page types, would require the addition of four conditional tags in HTML!).

Blogging on the go with BlackBerry

Every blogger, at one point or another, will experience the sedentary blues. By its very nature blogging is a solitary, static act. Even in a group blog setting, when it comes time to write a post it's just you in front of your computer. After days, weeks, and months, the desire to get out of the house and work elsewhere can become tough to ignore. Seasoned bloggers know the best places to get a breath of fresh air: coffee shops and libraries. But what happens when those haunts get stale? What happens on a nice day when you want to stretch out at the park?
Of course, there is no WiFi network at your local park. There might not be any power outlets. That leaves blogging prospects pretty slim. You can write, sure, but you'll lack the internet as a research tool. There has to be a compromise right? The easiest way to write at the park is to tether your smartphone to your laptop. But nowadays carriers are charging extra for that feature. The solution, then? Write on your smartphone.
mobile bloggingThe BlackBerry has long been a writer's and telecommuter's lifeline. It provides an email platform that is second to none, and an organizational system, including calendar and task lists, that match any other smartphone platform. Kids these days might be buying iPhones and Android smartphones, but for the professional the BlackBerry is still the gold standard. Its most attractive feature, the physical keyboard, can help you get out of the house and into the park, all while keeping up with your blogging.
Recently Research In Motion released a whole new line of BlackBerry models -- models that, unlike their predecessors, do not disappoint. They're fast, powerful devices that can let you surf the internet, organize your life, track your email, and, yes, keep up your blog while on the go. The BlackBerry Montana, now known as the Bold 9930, might be the ideal device for all of this. It combines the best of the old BlackBerry -- the organization and the physical keyboard -- with the best in new technology: a touchscreen. The combination provides users with powerful tools that let them do work from wherever they may roam.
Unlike older BlackBerry models, the internet browser is actually usable on the Bold 9930. It loads pages quickly and lacks the lag issues that plagued earlier models. That makes it viable for quick research. Stuck on an idea? Search around and see what you can find, just as you would on your desktop or laptop at home. Need to check facts or find some missing information? It's all easy with the new, faster browser. In fact, that's one of the biggest upgrades in this model.
Apps, too, play a role in the BlackBerry's ability to keep you mobile. For WordPress users, there might be no app more important than WordPress for BlackBerry. In the app you can not only create new posts, but you can manage your blog just as you would from home. You can create posts, upload and add images, categorize and tag, and even schedule the post for later publishing. And when you're done with the post, you can go to your tasks lists and check it off.
(Editor’s remark: For Blogger platform, there is no app available at present. Users can use Blogger Mobile instead.)
The only issue users might have with writing on the BlackBerry is the keyboard. Yet after a short acclimation period, most users will find that thumb typing can still yield fast word per minute rates. In fact, the BlackBerry Bold 9930 has the most comfortable keyboard of any BlackBerry model to date, complete with large keys. It makes writing a post a snap -- unlike Android and iPhone, where you have to use a clunky touchscreen keyboard. The physical keyboard on the BlackBerry makes writing not only possible, but perhaps even enjoyable.
In the past few years the BlackBerry has gotten a reputation as inferior to Android and iPhone, but that's a general and inaccurate assessment. For professionals, especially blogging professionals, the BlackBerry still provides essential features. Bloggers using the WordPress platform will find everything they need right on the BlackBerry. Brainstorm, research, and then write from wherever. And you don't even need to lug along your laptop.

Essential iPhone Apps For Every Blogger

iphone apps for blogging As mobile high speed internet connections become faster and more reliable, we can expect blogging to become more mobile as well. Typing out a full blog post including images and media on an iPhone used to be a chore. Nowadays, blogging from your iPhone is relatively painless and hassle-free with the use of a few handy applications from the iTunes Store. Here are 8 of the best blogging apps on the market today for the iPhone platform.
 

WordPress

When most people think of blogging, they think Wordpress. The Wordpress iPhone App gives anybody the ability to update their Wordpress-based or hosted blog quickly and easily. Featuring an intuitive and responsive interface and support for nearly every capability baked into Wordpress, the official iPhone app is all you need to blog on the go. Just make sure you have Wordpress 2.9.2 or above installed, and this application will fit your work flow perfectly.
 

Blogger

Believe it or not, many people still use Blogger to publish content on the web; quite a few people, in fact. While many have moved on to Wordpress, Tumblr, Typepad, and other platforms, Blogger remains popular. That's why the Blogger application is such a big draw at the iTunes Store. It does exactly what you'd expect, without a lot of fuss or confusing options to muddle through. If you're looking for a simple way to post to your Blogger blog, this is the application for you.
 

Tumblr

It seems like all the cool kids are using Tumblr nowadays. The Tumblr app for the iOS platform is basically the same thing as the Wordpress application, but with a greater focus on media and quick blogging. Many Tumblr users tend to publish shorter posts, and that's reflected in the user interface. If you just want to dash off a quick blurb to your Tumblr blog, this is the best way to do it.

EverNote

Sometimes, keeping sources and information well-organized and at arm's reach is of paramount importance when you're running a well-read, high traffic blog. When inspiration for your next killer post strikes or you just want to share something with a friend or colleague, the EverNote iPhone app is your best friend. Whether it's a great photo, quote, or video clip that you want to access later, Evernote is the best way to archive things on your iPhone.
 

Byline

In a nutshell, Byline is basically just a feed aggregator for your favorite RSS streams, news websites, and blogs. What sets Byline apart is its refined UI, snappy responsiveness, and ease of configuration. You can set up your news streams any which way you like, and it also utilizes local storage to intelligently cache feeds in case you lose your high speed Internet connection while you're on the go.
 

Adobe Photoshop Express

Most people wouldn't think that you'd be able to accomplish a lot of photo manipulation on a smart phone. They clearly haven't met Adobe Photoshop Express, a nifty application that allows anyone with an iPhone to perform a number of different operations on images and photographs. Whether you need to crop a snapshot, apply a filter, or use special effects, Photoshop Express has you covered.
 

Air Sharing

You have to hand it to Apple, they make sharing and transferring files easy, as long as you're using Apple products, of course. Air Sharing makes it a simple task to compose drafts on your iPhone and then quickly transfer them to your computer at home or at the office for a final review before you publish your work. If you're a Mac user who blogs, Air Sharing belongs on whatever mobile device you use.
 

Analytics App

The name of this application pretty much says it all. Analytics App is focused on giving users the ability to interact with their Google Analytics account and get information about web traffic on the go. It allows you to customize your data and results any way you see fit. Now that Google Analytics delivers real-time results on web traffic, any blogger with a popular website can't afford to not have an analytics application on their smart phone.
 

The long and short of it

Ultimately, it's tough to make up for the lack of screen real estate that a laptop or even a tablet can provide. But you can still be a productive and effective mobile blogger with the help of a few handy applications such as the ones listed above. Thanks to a little innovative software, location and hardware constrictions don't have to curtail your ability to blog when you're away from home.

Interesting web sharing trends

addthis sharing trendsWhat is the best time to publish your posts? What is the most popular method of sharing content? Well if you are looking for the answers, read further.
AddThis recently highlighted some interesting findings on web sharing trends,  by analyzing its five years’ (2006-2010) worth of data. While the data may not give the complete sharing picture, it’s still worth checking out considering AddThis claims to be the largest content sharing platform on the web, used by 10 million websites and reaches 1.2 billion users each month.
Maybe we can learn something from those findings, like how do people share content on the web? When do they share it? What are the most popular social media sharing sites? etc.
Below are some of the findings:
 

Top sharing times

  • Peak hour: Peak sharing occurs at 9:30am EST (14:30 GMT) every day.
  • Peak Day: Wednesdays are the peak days for sharing.

When do people click?

  • Most users click 2 minutes after the content is shared.
  • 75% of clicks occur within the first day of a share.

Top shares growth all time

  • Twitter: 35,356%
  • Facebook & Like: 5,809%
  • LinkedIn: 3,226%
  • StumbleUpon: 2,912%
  • Tumblr: 1,142%

Past year (2010) growth

Trending Up
Trending Down
Facebook Send: 756% iGoogle: -68%
Tumblr: 532% AOL Lifestream: -63%
Google +1: 418% MySpace: -53%
PingFM: 272% Delicious: -46%
LinkedIn: 243% Digg: -46%

Most sharing happens via URL copy-paste

Still most sharing is done by copying URLs directly from the address bar to emails, IMs and other social channels. This method is used up to 10 times more  than sharing tools.